Internet Connection Sharing with Windows XP
ICS and ICF allow a home user to share an always-on connection with security and without buying a license for expensive firewall software. Even a dial-up link can benefit from ICS and ICF, providing network address translation, addressing, and name resolution services for all the computers on your network plus security.
Setting Up Internet Connection Sharing
You will need to designate a Windows XP computer as the host. This computer must have two network adapters, one for your internal network and one for the Internet connection. Before attempting to enable ICS, verify that the host computer has a working connection to the Internet through the network card connected to the cable modem or DSL line, or on the network connection associated with the modem. The easiest way to enable ICS is to use the Network Setup Wizard, by following these steps:
- Click Start, point to All Programs, point to Accessories, point to Communications, and then click Network Setup Wizard.
- Click Next until you see the Select a connection method screen.
- Click This computer connects directly to the Internet, and complete the wizard to install ICS.
Turning on ICS manually is almost as easy as using the wizard except that you need to create the bridge for multiple network cards before enabling ICS. (See an earlier column, Building Network Bridges for more information on how to use the bridging capability in Windows XP.) Then take these steps:
- In Control Panel, click Network and Internet Connections and then click Network Connections.
- Click the local area network (LAN) connection or the dial-up networking connection that you want to share (that is, the one that connects to the Internet), and then, under Network Tasks, click Change settings of this connection.
- Disable Client for Microsoft Networks and File and Print Sharing for Microsoft Networks by clearing the check boxes shown in Figure, This step is extremely important. Never leave these items enabled for any network card that is directly connected to the Internet
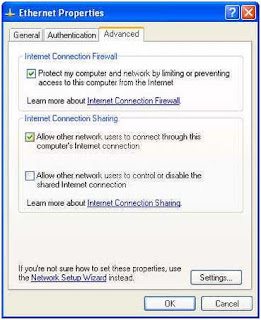
- Click the Advanced tab, and select the Allow other network users to connect through this computer's Internet connection check box.

- You can enable or disable the allowing of other users to control the connection—users don't need to be able to control the connection to use it.
- Under Internet Connection Firewall, select the Protect my computer and network by limiting or preventing access to this computer from the Internet check box for this network card, unless you have another firewall between the computer and the Internet. This is very important.
- Click OK, and Internet Connection Sharing will be enabled.
0 comments: on "How to setup Internet Connection Sharing"
Post a Comment